更多功能
har to case
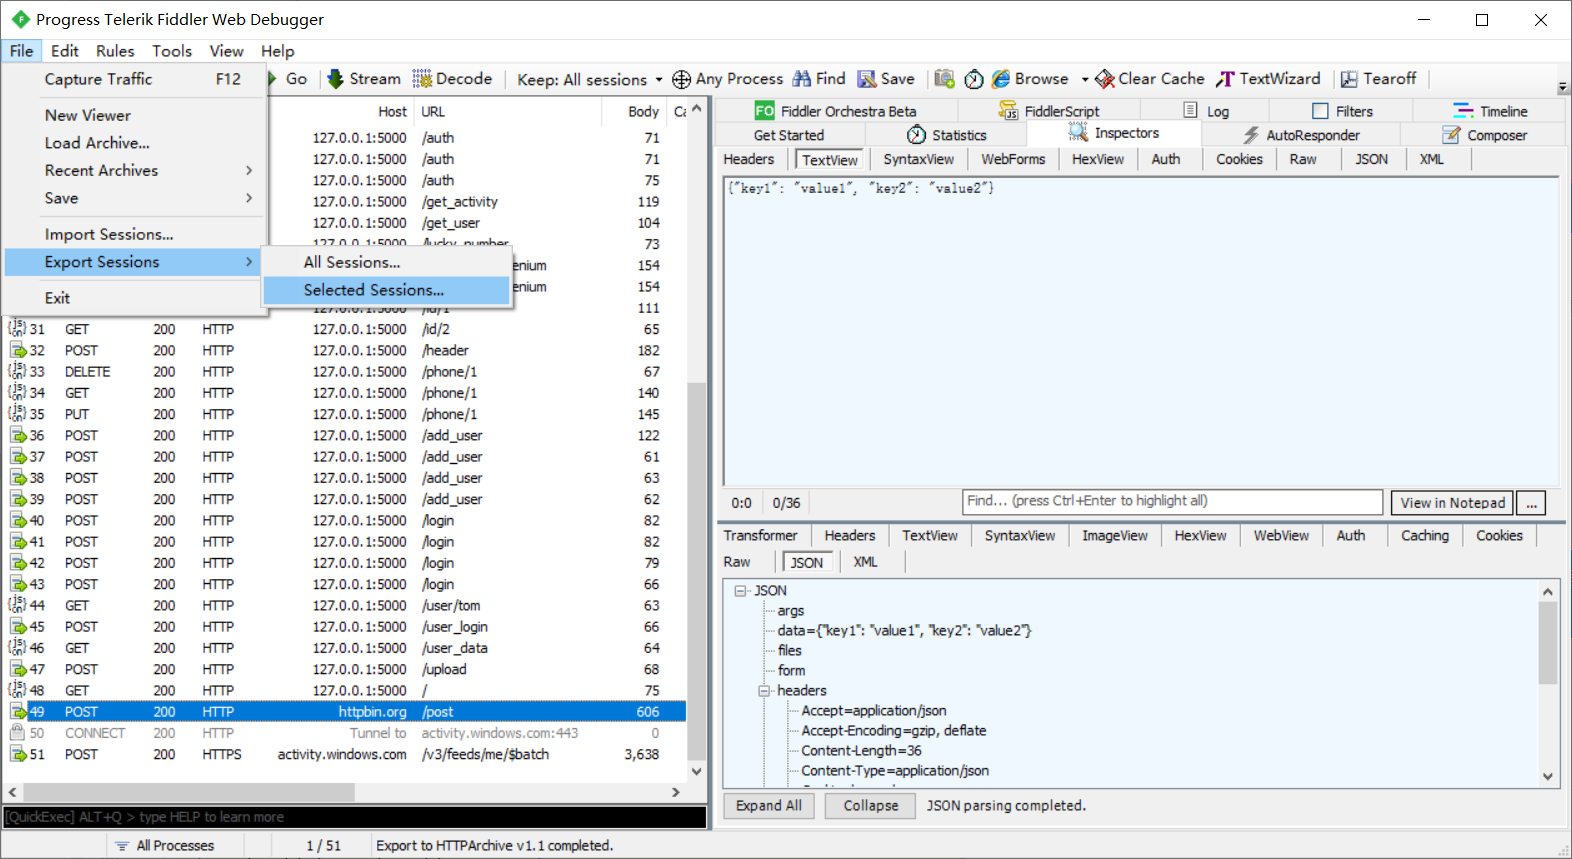
对于不熟悉 Requests 库的人来说,通过Seldom来写接口测试用例还是会有一点难度。于是,seldom 提供了har 文件转 case 的命令。
首先,打开fiddler 工具进行抓包,选中某一个请求。
然后,选择菜单栏:file -> Export Sessions -> Selected Sessions...
选择导出的文件格式。
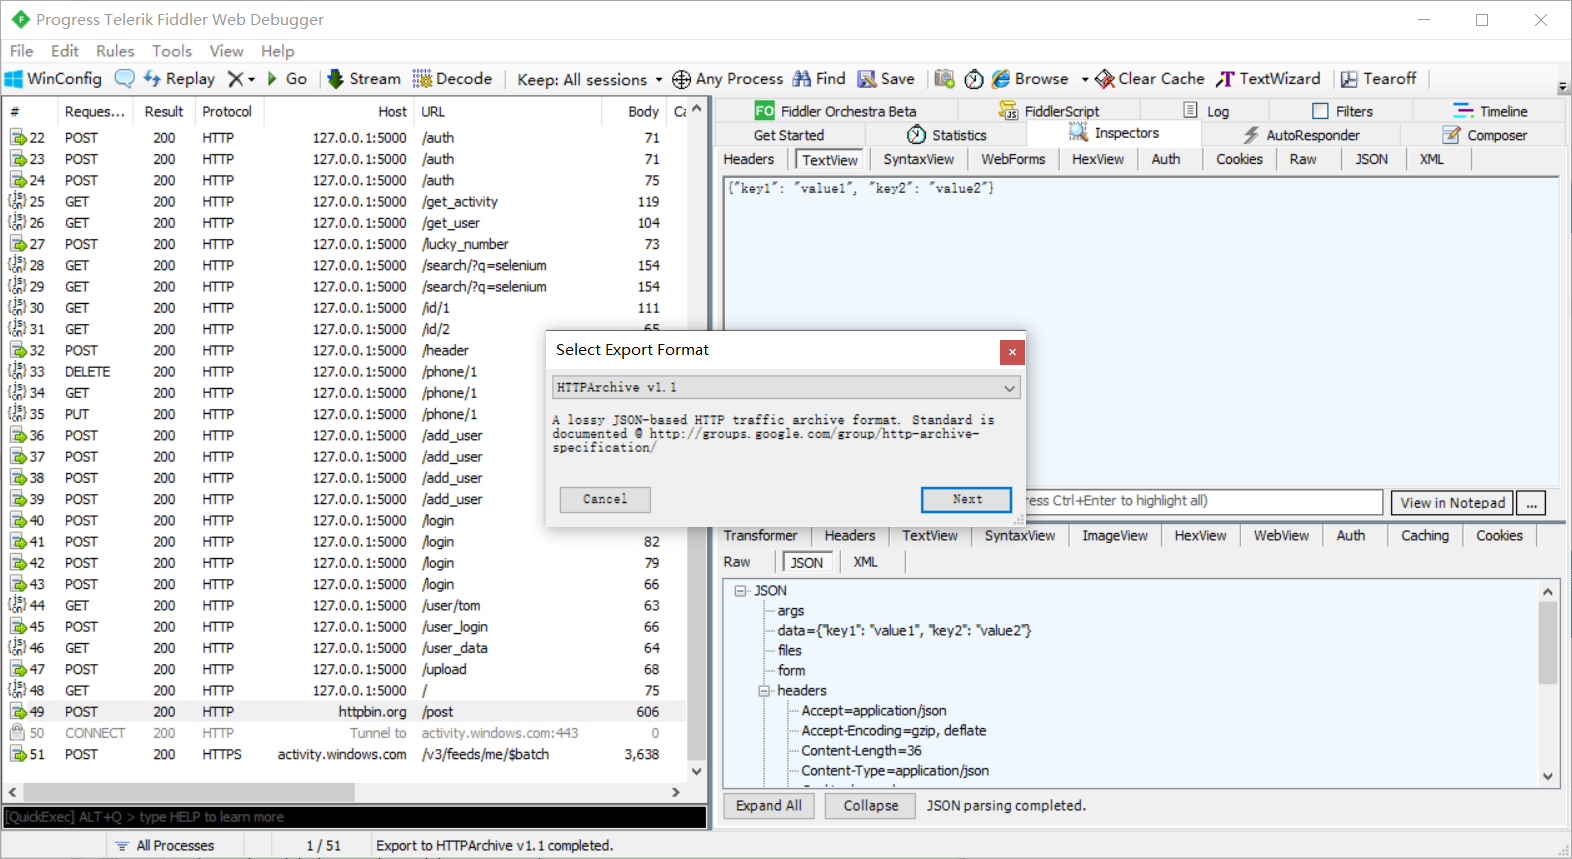
点击next 保存为demo.har 文件。
最后,通过seldom -h2c 转为demo.py 脚本文件。
> seldom -h2c demo.har

2021-06-14 18:05:50 [INFO] Start to generate testcase.
2021-06-14 18:05:50 [INFO] created file: ...\demo.py
demo.py 文件。
import seldom


class TestRequest(seldom.TestCase):

    def start(self):
        self.url = "http://httpbin.org/post"

    def test_case(self):
        headers = {"User-Agent": "python-requests/2.25.0", "Accept-Encoding": "gzip, deflate",
                   "Accept": "application/json", "Connection": "keep-alive", "Host": "httpbin.org",
                   "Content-Length": "36", "Origin": "http://httpbin.org", "Content-Type": "application/json",
                   "Cookie": "lang=zh"}
        cookies = {"lang": "zh"}
        self.post(self.url, json={"key1": "value1", "key2": "value2"}, headers=headers, cookies=cookies)
        self.assertStatusCode(200)


if __name__ == '__main__':
    seldom.main()
swagger to case
seldom 3.6 版本支持。
seldom 提供了swagger 转 case 的命令。 使用 seldom -s2c 命令。
> seldom -s2c swagger.json

2024-03-04 00:02:22 | INFO     | core.py | Start to generate testcase.
2024-03-04 00:02:22 | INFO     | core.py | created file: ...\swagger.py
将swagger文档转为 seldom 自动化测试用例。
import seldom


class TestRequest(seldom.TestCase):

    def test_pet_petId_uploadImage_api_post(self):
        url = f"https://petstore.swagger.io/pet/{petId}/uploadImage"
        params = {}
        headers = {}
        headers["Content-Type"] = "multipart/form-data"
        data = {"additionalMetadata": additionalMetadata, "file": file}
        r = self.post(url, headers=headers, params=params, data=data)
        print(r.status_code)

    def test_pet_api_post(self):
        url = f"https://petstore.swagger.io/pet"
        params = {}
        headers = {}
        headers["Content-Type"] = "application/json"
        data = {}
        r = self.post(url, headers=headers, params=params, data=data)
        print(r.status_code)
需要注意的是,转换的seldom自动化测试用例有一些变量,需要用户根据实际情况进行定义。
请求转 cURL
seldom 支持将请求转成cCURL命令, 你可以方便的通过cURL命令执行,或者导入到其他接口工具,例如,postman 支持cURL命令导入。
# test_http.py
import seldom


class TestRequest(seldom.TestCase):
    """
    http api test demo
    doc: https://requests.readthedocs.io/en/master/
    """

    def test_get_curl(self):
        """
        test get curl
        """
        self.get('http://httpbin.org/get', params={'key': 'value'})
        curl = self.curl()
        print(curl)
        self.post('http://httpbin.org/post', data={'key': 'value'})
        curl = self.curl()
        print(curl)

        # or
        r = self.delete('http://httpbin.org/delete', params={'key': 'value'})
        curl = self.curl(r.request)
        print(curl)
        r = self.put('http://httpbin.org/put', json={'key': 'value'}, headers={"token": "123"})
        curl = self.curl(r.request)
        print(curl)


if __name__ == '__main__':
    seldom.main(debug=True)
- 日志结果
> python test_http.py

...
curl -X GET  'Content-Type: application/json'  -H 'token: 123' -d '{"key": "value"}' http://httpbin.org/get

curl -X POST  'Content-Type: application/x-www-form-urlencoded' -H  -d key=value http://httpbin.org/post

curl -X DELETE  'http://httpbin.org/delete?key=value'

curl -X PUT  -H 'Content-Type: application/json' -H 'token: 123' -d '{"key": "value"}' http://httpbin.org/put
接口数据依赖
在场景测试中,我们需要利用上一个接口的数据,调用下一个接口。
- 简单的接口依赖
import seldom


class TestRespData(seldom.TestCase):

    def test_data_dependency(self):
        """
        Test for interface data dependencies
        """
        headers = {"X-Account-Fullname": "bugmaster"}
        self.get("/get", headers=headers)
        self.assertStatusCode(200)

        username = self.response["headers"]["X-Account-Fullname"]
        self.post("/post", data={'username': username})
        self.assertStatusCode(200)
seldom提供了self.response用于记录上个接口返回的结果,直接拿来用即可。
- 封装接口依赖
- 创建公共模块
# common.py
from seldom.request import check_response
from seldom.request import HttpRequest


class Common(HttpRequest):

    @check_response(
        describe="获取登录用户名",
        status_code=200,
        ret="headers.Account",
        check={"headers.Host": "httpbin.org"},
        debug=True
    )
    def get_login_user(self):
        """
        调用接口获得用户名
        """
        headers = {"Account": "bugmaster"}
        r = self.get("http://httpbin.org/get", headers=headers)
        return r


if __name__ == '__main__':
    c = Common()
    c.get_login_user()
- 运行日志
2023-02-14 23:51:48 request.py | DEBUG | Execute get_login_user - args: (<__main__.Common object at 0x0000023263075100>,)
2023-02-14 23:51:48 request.py | DEBUG | Execute get_login_user - kwargs: {}
2023-02-14 23:51:48 request.py | INFO | -------------- Request -----------------[🚀]
2023-02-14 23:51:48 request.py | INFO | [method]: GET      [url]: http://httpbin.org/get
2023-02-14 23:51:48 request.py | DEBUG | [headers]:
 {
  "Account": "bugmaster"
}
2023-02-14 23:51:49 request.py | INFO | -------------- Response ----------------[🛬️]
2023-02-14 23:51:49 request.py | INFO | successful with status 200
2023-02-14 23:51:49 request.py | DEBUG | [type]: json      [time]: 0.601097
2023-02-14 23:51:49 request.py | DEBUG | [response]:
 {
  "args": {},
  "headers": {
    "Accept": "*/*",
    "Accept-Encoding": "gzip, deflate",
    "Account": "bugmaster",
    "Host": "httpbin.org",
    "User-Agent": "python-requests/2.28.1",
    "X-Amzn-Trace-Id": "Root=1-63ebae14-1e629b132c21f68e23ffeb33"
  },
  "origin": "173.248.248.88",
  "url": "http://httpbin.org/get"
}
2023-02-14 23:51:49 request.py | DEBUG | Execute get_login_user - response:
 {'args': {}, 'headers': {'Accept': '*/*', 'Accept-Encoding': 'gzip, deflate', 'Account': 'bugmaster', 'Host': 'httpbin.org', 'User-Agent': 'python-requests/2.28.1', 'X-Amzn-Trace-Id': 'Root=1-63ebae14-1e629b132c21f68e23ffeb33'}, 'origin': '173.248.248.88', 'url': 'http://httpbin.org/get'}
2023-02-14 23:51:49 request.py | INFO | Execute get_login_user - 获取登录用户名 success!
@check_response 专门用于处理封装的方法。
参数说明:
describe: 封装方法描述。status_code: 判断接口返回的 HTTP 状态码,默认200。ret: 提取接口返回的字段,参考jmespath提取规则。check: 检查接口返回的字段。参考jmespath提取规则。debug: 开启debug,打印更多信息。
- 引用公共模块
import seldom
from common import Common


class TestRequest(seldom.TestCase):

    def start(self):
        self.c = Common()

    def test_case(self):
        # 调用 get_login_user() 获取
        user = self.c.get_login_user()
        self.post("http://httpbin.org/post", data={'username': user})
        self.assertStatusCode(200)


if __name__ == '__main__':
    seldom.main(debug=True)
Session使用
在实际测试过程中,大部分接口需要登录,Session 是一种非常简单记录登录状态的方式。
import seldom


class TestCase(seldom.TestCase):

    def start(self):
        self.s = self.Session()
        self.s.get('/cookies/set/sessioncookie/123456789')

    def test_get_cookie1(self):
        self.s.get('/cookies')

    def test_get_cookie2(self):
        self.s.get('/cookies')


if __name__ == '__main__':
    seldom.main(debug=True, base_url="https://httpbin.org")
用法非常简单,你只需要在每个接口之前调用一次登录, self.s对象就记录下了登录状态,通过self.s 再去调用其他接口就不需要登录。
提取接口返回数据
当接口返回的数据比较复杂时,我们需要有更方便方式去提取数据,seldom提供 jmespath、jsonpath 来简化数据提取。
- 接口返回数据
{
  "args": {
    "hobby": [
      "basketball",
      "swim"
    ],
    "name": "tom"
  },
  "headers": {
    "Accept": "*/*",
    "Accept-Encoding": "gzip, deflate",
    "Host": "httpbin.org",
    "User-Agent": "python-requests/2.25.0",
    "X-Amzn-Trace-Id": "Root=1-62851614-1ca9fdb276238c60406c118f"
  },
  "origin": "113.87.15.99",
  "url": "http://httpbin.org/get?name=tom&hobby=basketball&hobby=swim"
}
- 常规提取
import seldom


class TestAPI(seldom.TestCase):

    def test_extract_responses(self):
        """
        提取 response 数据
        """
        payload = {"hobby": ["basketball", "swim"], "name": "tom", "age": "18"}
        self.get("http://httpbin.org/get", params=payload)

        # response
        response1 = self.response["args"]["name"]
        response2 = self.response["args"]["hobby"]
        response3 = self.response["args"]["hobby"][0]
        print(f"response1 --> {response1}")
        print(f"response2 --> {response2}")
        print(f"response3 --> {response3}")

        # jmespath
        jmespath1 = self.jmespath("args.name")
        jmespath2 = self.jmespath("args.hobby")
        jmespath3 = self.jmespath("args.hobby[0]")
        jmespath4 = self.jmespath("hobby[0]", response=self.response["args"])
        print(f"\njmespath1 --> {jmespath1}")
        print(f"jmespath2 --> {jmespath2}")
        print(f"jmespath3 --> {jmespath3}")
        print(f"jmespath4 --> {jmespath4}")

        # jsonpath
        jsonpath1 = self.jsonpath("$..name")
        jsonpath2 = self.jsonpath("$..hobby")
        jsonpath3 = self.jsonpath("$..hobby[0]")
        jsonpath4 = self.jsonpath("$..hobby[0]", index=0)
        jsonpath5 = self.jsonpath("$..hobby[0]", index=0, response=self.response["args"])
        print(f"\njsonpath1 --> {jsonpath1}")
        print(f"jsonpath2 --> {jsonpath2}")
        print(f"jsonpath3 --> {jsonpath3}")
        print(f"jsonpath4 --> {jsonpath4}")
        print(f"jsonpath5 --> {jsonpath5}")


...
说明:
response: 保存接口返回的数据,可以直接以,字典列表的方式提取。jmespath(): 根据 JMESPath 语法规则,默认提取接口返回的数据,也可指定resposne数据提取。jsonpath(): 根据 JsonPath 语法规则,默认提取接口返回的数据,index指定下标,也可指定resposne数据提取。
运行结果:
2022-05-19 00:57:08 log.py | DEBUG | [response]:
 {'args': {'age': '18', 'hobby': ['basketball', 'swim'], 'name': 'tom'}, 'headers': {'Accept': '*/*', 'Accept-Encoding': 'gzip, deflate', 'Host': 'httpbin.org', 'User-Agent': 'python-requests/2.25.0', 'X-Amzn-Trace-Id': 'Root=1-62852563-2fe77d4b1ce544696af60f10'}, 'origin': '113.87.15.99', 'url': 'http://httpbin.org/get?hobby=basketball&hobby=swim&name=tom&age=18'}

response1 --> tom
response2 --> ['basketball', 'swim']
response3 --> basketball

jmespath1 --> tom
jmespath2 --> ['basketball', 'swim']
jmespath3 --> basketball
jmespath4 --> basketball

jsonpath1 --> ['tom']
jsonpath2 --> [['basketball', 'swim']]
jsonpath3 --> ['basketball']
jsonpath4 --> basketball
jsonpath5 --> basketball
运行结果
...
2022-04-10 21:05:17.683 | DEBUG    | seldom.logging.log:debug:34 - [response]:
 {'args': {'age': '18', 'hobby': ['basketball', 'swim'], 'name': 'tom'}, 'headers': {'Accept': '*/*', 'Accept-Encoding': 'gzip, deflate', 'Host': 'httpbin.org', 'User-Agent': 'python-requests/2.25.0', 'X-Amzn-Trace-Id': 'Root=1-6252d60c-551433d744b6869e5d1944d7'}, 'origin': '113.87.12.14', 'url': 'http://httpbin.org/get?hobby=basketball&hobby=swim&name=tom&age=18'}

2022-04-10 21:05:17.686 | DEBUG    | seldom.logging.log:debug:34 - [jresponse]:
 ['basketball']
2022-04-10 21:05:17.689 | DEBUG    | seldom.logging.log:debug:34 - [jresponse]:
 ['18']
genson
通过 assertSchema() 断言时需要写JSON Schema,但是这个写起来需要学习成本,seldom集成了GenSON ,可以帮你自动生成。
- 例子
import seldom
from seldom.utils import genson


class TestAPI(seldom.TestCase):

    def test_assert_schema(self):
        payload = {"hobby": ["basketball", "swim"], "name": "tom", "age": "18"}
        self.get("/get", params=payload)
        print("response \n", self.response)

        schema = genson(self.response)
        print("json Schema \n", schema)

        self.assertSchema(schema)
- 运行日志
...
response
 {'args': {'age': '18', 'hobby': ['basketball', 'swim'], 'name': 'tom'}, 'headers': {'Accept': '*/*', 'Accept-Encoding': 'gzip, deflate', 'Host': 'httpbin.org', 'User-Agent': 'python-requests/2.25.0', 'X-Amzn-Trace-Id': 'Root=1-626574d0-4c04bb7e76a53e8042c9d856'}, 'origin': '173.248.248.88', 'url': 'http://httpbin.org/get?hobby=basketball&hobby=swim&name=tom&age=18'}

json Schema
 {'$schema': 'http://json-schema.org/schema#', 'type': 'object', 'properties': {'args': {'type': 'object', 'properties': {'age': {'type': 'string'}, 'hobby': {'type': 'array', 'items': {'type': 'string'}}, 'name': {'type': 'string'}}, 'required': ['age', 'hobby', 'name']}, 'headers': {'type': 'object', 'properties': {'Accept': {'type': 'string'}, 'Accept-Encoding': {'type': 'string'}, 'Host': {'type': 'string'}, 'User-Agent': {'type': 'string'}, 'X-Amzn-Trace-Id': {'type': 'string'}}, 'required': ['Accept', 'Accept-Encoding', 'Host', 'User-Agent', 'X-Amzn-Trace-Id']}, 'origin': {'type': 'string'}, 'url': {'type': 'string'}}, 'required': ['args', 'headers', 'origin', 'url']}
mock URL
seldom 3.2.3 支持
seldom 运行允许通过confrun.py文件中mock_url() 配置mock URL映射。
confrun.py配置要映射的mock URL。
def mock_url():
    """
    mock url
    :return:
    """
    config = {
        "http://httpbin.org/get": "http://127.0.0.1:8000/api/data",
    }
    return config
- test_api.py
import seldom


class TestRequest(seldom.TestCase):
    """
    http api test demo
    """

    def test_get_method(self):
        payload = {'key1': 'value1', 'key2': 'value2'}
        self.get("/get", params=payload)
        self.assertStatusCode(200)


if __name__ == '__main__':
    seldom.main(base_url="http://httpbin.org")
- 运行
> python test_api.py

2023-07-30 14:47:08 | INFO     | request.py | -------------- Request -----------------[🚀]
2023-07-30 14:47:08 | INFO     | request.py | [method]: GET      [url]: http://httpbin.org/get
2023-07-30 14:47:08 | DEBUG    | request.py | [params]:
{
  "key1": "value1",
  "key2": "value2"
}
2023-07-30 14:47:08 | DEBUG    | request.py | mock url: http://127.0.0.1:8000/api/data
2023-07-30 14:47:08 | INFO     | request.py | -------------- Response ----------------[🛬️]
2023-07-30 14:47:08 | INFO     | request.py | successful with status 200
2023-07-30 14:47:08 | DEBUG    | request.py | [type]: json      [time]: 0.002738
2023-07-30 14:47:08 | DEBUG    | request.py | [response]:
 [{'item_name': 'apple'}, {'item_name': 'banana'}, {'item_name': 'orange'}, {'item_name': 'watermelon'}, {'item_name': 'grape'}]
2023-07-30 14:47:08 | INFO     | case.py | 👀 assertStatusCode -> 200.
通过日志可以看到 http://httpbin.org/get 替换成为 http://127.0.0.1:8000/api/data 执行。 当你不想mock的时候只需要修改 mock_url() 即可,对于用例来说无影响。
配置proxies代理
seldom 3.11.0
单个方法设置代理
seldom 支持在每个请求方法中设置代理。
import seldom


class TestHttpAssert(seldom.TestCase):

    def test_req_proxy(self):
        """
        test request proxy
        """
        payload = {"name": "tom", "hobby": ["basketball", "swim"]}
        proxies = {
            "https": "http://localhost:1080",
            "http": "http://localhost:1080",
        }
        self.get("/get", params=payload, proxies=proxies)
全局设置代理
当我们要所有用例都使用代理时,每个方法都单独设置就很麻烦了,可以使用confrun.py全局设置。
- 目录结构
├───reports
├───test_data
├───test_dir
│   ├───...
├───confrun.py # 配置文件
└───run.py
confrun.py配置要映射的mock URL。
def proxies():
    """
    http proxies
    """
    proxies_conf = {
        "https": "http://localhost:1080",
        "http": "http://localhost:1080",
    }
    return proxies_conf
通过run.py文件全局运行测试,这里的代理配置将作用于所有请求方法。
保存响应结果
seldom > 3.13
有时候接口的response非常的长,终端显示不完整,那我们就可以使用save_response()将结果保存到文件中。
import seldom


class TestSaveResp(seldom.TestCase):

    def test_save_response(self):
        """将response保存到文件中"""
        resp = self.get("/get")
        self.save_response(resp)


if __name__ == '__main__':
    seldom.main(base_url="https://httpbin.org")
保存响应结果
seldom > 3.13
当我们本地使用了host切换,需要知道当前的请求是否指向了host地址,可以使用ip_address()方法。
import seldom


class TestReqIP(seldom.TestCase):

    def test_get_ip_address(self):
        """检查当前请求的IP地址"""
        self.get("/get")
        self.ip_address()


if __name__ == '__main__':
    seldom.main(base_url="https://httpbin.org")
@retry装饰器
@retry() 装饰器用于用法失败充实,例如封装的登录方法,允许API调用失败后再次尝试。
示例如下:
from seldom.request import HttpRequest
from seldom.request import check_response, retry


class LoginAPIObject(HttpRequest):

    @retry(times=2, wait=3)
    @check_response(ret="form.token")
    def user_login(self, username: str, password: str) -> str:
        """
        模拟:登录API
        """
        params = {"username": username, "token": password}
        r = self.post("/error", json=params)
        return r


if __name__ == '__main__':
    login = LoginAPIObject()
    login.user_login("tom", "abc123")
@retry()装饰器,times参数指定重试次数,默认3次,wait参数指定重试间隔,默认1s。@retry()装饰器可以单独使用,也可以和@check_response()装饰器一起使用,如果一起使用的话,需要在上方。
运行结果:
2024-03-04 22:36:09 | INFO     | request.py | -------------- Request -----------------[🚀]
2024-03-04 22:36:09 | INFO     | request.py | [method]: POST      [url]: /error
2024-03-04 22:36:09 | DEBUG    | request.py | [json]:
{
  "username": "tom",
  "token": "abc123"
}
2024-03-04 22:36:09 | WARNING  | request.py | Attempt to execute <user_login> failed with error: 'Invalid URL '/error': No scheme supplied. Perhaps you meant https:///error?'. Attempting retry number 1...
2024-03-04 22:36:12 | INFO     | request.py | -------------- Request -----------------[🚀]
2024-03-04 22:36:12 | INFO     | request.py | [method]: POST      [url]: /error
2024-03-04 22:36:12 | DEBUG    | request.py | [json]:
{
  "username": "tom",
  "token": "abc123"
}
2024-03-04 22:36:12 | WARNING  | request.py | Attempt to execute <user_login> failed with error: 'Invalid URL '/error': No scheme supplied. Perhaps you meant https:///error?'. Attempting retry number 2...
2024-03-04 22:36:15 | INFO     | request.py | -------------- Request -----------------[🚀]
2024-03-04 22:36:15 | INFO     | request.py | [method]: POST      [url]: /error
2024-03-04 22:36:15 | DEBUG    | request.py | [json]:
{
  "username": "tom",
  "token": "abc123"
}
Traceback (most recent call last):
  File "D:\github\seldom\api\auth_object.py", line 20, in <module>
    login.user_login("tom", "abc123")
  ....
  File "C:\Users\fnngj\.virtualenvs\seldom-wKum2rzm\Lib\site-packages\requests\models.py", line 439, in prepare_url
    raise MissingSchema(
requests.exceptions.MissingSchema: Invalid URL '/error': No scheme supplied. Perhaps you meant https:///error?
从运行结果可以看到,调用接口重试了2次,如果仍然错误,抛出异常。
加密工具
seldom > 3.11.0
在进行接口测试的时候,经常设计参数的加密,例如:MD5、AES等。Seldom 框架提供完整的加密解密功能,支持以下功能:
- 哈希算法
- MD5
- SHA1/SHA224/SHA256/SHA384/SHA512
- HMAC
- 对称加密
- AES (CBC/ECB/CFB/OFB/CTR)
- DES
- 3DES
- 非对称加密
- RSA
- 编码转换
- Base16/Base32/Base64/Base85
- URL编码
- HTML编码
示例
import unittest

# 导入待测试的模块
from seldom.utils.encrypt import (
    CipherMode,
    HashUtil,
    AESUtil,
    EncodeUtil,
)


class TestHashUtil(unittest.TestCase):
    """测试 HashUtil 类"""

    def test_md5(self):
        text = "hello world"
        expected = "5eb63bbbe01eeed093cb22bb8f5acdc3"
        self.assertEqual(HashUtil.md5(text), expected)

    def test_sha256(self):
        text = "hello world"
        expected = "b94d27b9934d3e08a52e52d7da7dabfac484efe37a5380ee9088f7ace2efcde9"
        self.assertEqual(HashUtil.sha256(text), expected)


class TestAESUtil(unittest.TestCase):
    """测试 AESUtil 类"""

    def test_encrypt_decrypt_cbc(self):
        key = "mysecretkey"
        text = "hello world"
        encrypted = AESUtil.encrypt(key, text, mode=CipherMode.CBC)
        decrypted = AESUtil.decrypt(key, encrypted, mode=CipherMode.CBC)
        self.assertEqual(decrypted, text)


class TestEncodeUtil(unittest.TestCase):
    """测试 EncodeUtil 类"""

    def test_base64_encode_decode(self):
        text = "hello world"
        encoded = EncodeUtil.base64_encode(text)
        decoded = EncodeUtil.base64_decode(encoded)
        self.assertEqual(decoded, text)

    def test_url_encode_decode(self):
        text = "hello world"
        encoded = EncodeUtil.url_encode(text)
        decoded = EncodeUtil.url_decode(encoded)
        self.assertEqual(decoded, text)

    def test_html_encode_decode(self):
        text = "<html>hello world</html>"
        encoded = EncodeUtil.html_encode(text)
        decoded = EncodeUtil.html_decode(encoded)
        self.assertEqual(decoded, text)


if __name__ == '__main__':
    unittest.main()
同时示例看到,我们可以非常低成本的使用各种加解密算法。
运行结果
> python .\test_encrypt.py
2025-01-07 18:20:12 | INFO     | encrypt.py | MainThread | ✅ [encrypt] method, generated data: jUTwE9UV8c/00d9Kl9UOhdTOoOwWYSVOJ7io72MtWeE=
2025-01-07 18:20:12 | INFO     | encrypt.py | MainThread | ✅ [decrypt] method, generated data: hello world
.2025-01-07 18:20:12 | INFO     | encrypt.py | MainThread | ✅ [base64_encode] method, generated data: aGVsbG8gd29ybGQ=
2025-01-07 18:20:12 | INFO     | encrypt.py | MainThread | ✅ [base64_decode] method, generated data: hello world
.2025-01-07 18:20:12 | INFO     | encrypt.py | MainThread | ✅ [html_encode] method, generated data: <html>hello world</html>
2025-01-07 18:20:12 | INFO     | encrypt.py | MainThread | ✅ [html_decode] method, generated data: <html>hello world</html>
.2025-01-07 18:20:12 | INFO     | encrypt.py | MainThread | ✅ [url_encode] method, generated data: hello%20world
2025-01-07 18:20:12 | INFO     | encrypt.py | MainThread | ✅ [url_decode] method, generated data: hello world
.2025-01-07 18:20:12 | INFO     | encrypt.py | MainThread | ✅ [md5] method, generated data: 5eb63bbbe01eeed093cb22bb8f5acdc3
.2025-01-07 18:20:12 | INFO     | encrypt.py | MainThread | ✅ [sha256] method, generated data: b94d27b9934d3e08a52e52d7da7dabfac484efe37a5380ee9088f7ace2efcde9
.
----------------------------------------------------------------------
Ran 6 tests in 0.005s

OK